Sunday, 6 July 2014

Bridal Shower Cupcake Cake


Recently I offered to make a cake for a friend's bridal shower at work.  I'm also making this friend's wedding favours, more on this in a few weeks :)

I was given free reign on the cake and told it only needed to feed 12 people.  Since it was going to be at work, I knew it's always better to have extra cake, in case more people showed up.  From my experience, there no such thing as too much cake at my work place!

I've seen a lot of bridal gown cupcake cakes during the hours I've spent on Pinterest, so I thought I'd give it a try.  I decided to go with this layout, which used 28 red velvet cupcakes.  I actually baked 36 cupcakes, as I tripled the recipe. 

My first batch didn't turn out well, as I accidentally mixed the sugar in with the dry ingredients, so I wasn't able to cream the oil and sugar together.  This caused the first batch to come out slightly oily and not rise properly, since creaming the oil with the sugar is when all the air is incorporated.  The flavour was still good, just the texture was slightly off.  This bad batch worked out in my family/friends favour, as it just meant more cupcakes for them :)   

I chose to use a cream cheese icing and iced the cupcakes using simple rosettes.  This cake looks really fancy, but it literally took less than 10 minutes to ice! 

A few days before the cake was going to be delivered, I made a quick bow out of fondant and left it to dry on a foam pad.  By the time it needed to be placed on the cake, it was all dry and firm.  The only mistake I made was putting it on the cake and then placing the entire thing into the fridge.  As soon as the fondant was in the fridge, it started to sweat and become soft, thankfully it wasn't there for too long and the bow kept most of its shape.  Next time, I'll just place the bow on right before delivery. 

I placed a purple sash and then the bow on top, and the cake was finished!


It was all well received, which I was happy about, and the bride was completely surprised :)  Some even asked for the recipe, which I think is a big compliment, I'm hoping it works out well for them too!  

Monday, 16 June 2014

Week 10: Chocolate Decadent Cake

 It's arrived...the last class of cakes 1 :(  No more weekly cake :(  But on a happy note, this week's cake was delicious.  I call it an almost flourless chocolate cake and will definitely be re-using the recipe.
I call it an almost flourless chocolate cake, since it contains about 3% flour and is super chocolatey and rich with about 50% pure chocolate.  It could easily be made gluten free by just removing the flour or adding ground almonds.  With all the chocolate in the cake, it had a very silky smooth texture.

This was probably the easiest cake to measure out, since it had a crazy small ingredients list; just chocolate, butter, eggs, sugar and a pinch of flour.  Melt it all together, bake it and you a pretty much done :p

To cover the cake, we made what else...a chocolate glaze...more chocolate!  Another simple ingredient list; chocolate, butter and corn syrup.  We poured it over the cooled cake, garnished with some raspberries and it was finished!  To enhance the glaze, when I make it again, I'll add some liquor to add more flavour, maybe match the liquor flavour to the the fruit that I might garnish it with.   

I'm not really a big chocolate lover, I usually choose fruity or nut flavoured cakes when given a choice, but I really liked this.  When microwaved for a few seconds, it was almost like a molten chocolate cake, melted and flowing in the center but still set on the outside. 

This cake would work really well if I was to try it again in ramekins for a dinner party :)

I got so many good recipes from cakes 1 at George Brown College and feel so much more confident trying different cake recipes now.  I really recommend the class to anyone looking to expand their baking skills.  

Next class...PASTRY :)  Can't wait!!


Sunday, 25 May 2014

Week 9: Chiffon Cheesecake

Cakes 1 is almost coming to an end...only one class left :( ...but at least this wasn't the very last class :)

This week we learned a new twist on cheesecake!  I'm a big cheesecake fan and am always ready to pull out my spring form pan and make a cheesecake when asked to make dessert for an event, so it was nice to learn a new way of making it, from my traditional new york style cheesecake.

New york style cheesecake, can be very dense and rich, but this cake was much lighter, allowing me to eat a lot more cheesecake than I usually can :p.  The cake was lightened with the addition of whipped egg whites which adds a lot of airiness.  In the which chocolate raspberry cheesecake I've made in the past, the filling was really simple, white chocolate, cream cheese, cream and sugar, but this cake had 6 eggs, flour, buttermilk and oil, making it much more cake like in consistency.  

The crust was a traditional graham cracker crust, which is super easy to make, just melted butter, graham cracker crumbs and sugar, but we added some toasted ground almonds to heighten the flavour :)

For the topping, we cooked down some frozen raspberries with sugar, water and cornstarch to thicken it up. 


Saturday, 3 May 2014

Week 8: Chocolate Mousse Cake

Another fun week in Cakes 1 :)  This week we made a chocolate mousse cake, surprisingly our first chocolate cake of the course.
This cake was layers of almond meringue (Japonaise) with a chocolate mousse filling covered in a chocolate glaze, it was light with a good chocolate flavour.

The cake got it's lightness from the airy meringue and silky smooth mousse.  The mousse was mainly whipped cream but also had whipped eggs with sugar, melted chocolate with butter and a little bit of gelatin for stability. 

Once the meringue was baked and cooled, it was layered together in a ring mold and placed in the blast chiller.  After a little while, it was time for the fun part, the glazing :)  I decided to cover the entire cake in chocolate and decorate with extra meringue bits and chocolate covered crunch balls.

I'm not usually a chocolate cake person, but this was really good, since it wasn't too dense and rich. 

Saturday, 26 April 2014

Week 7: Tiramisu Cake

This week's cake was the most time consuming and complicated  cake so far!  There were so many different components and steps, but it was all worth it when people tasted the cake :)  I've made a version of Tiramisu before, with a filling made of cream cheese, sour cream and whipped cream, which I've gotten good reviews on...but I've never made the authentic thing with mascarpone cheese, mainly because it is so expensive, thankfully the ingredients were all provided in class!     

The first component we made was the lady fingers.  We did this differently from a traditional Tiramisu, where the lady fingers are each piped out separately.  We made the traditional batter but then piped it out into a cake round and one large sheet pan, with a zig zig pattern.  When they were done baking, we cut the sheet cake lady fingers into a long strip and attached it to the side of the cake in one piece.  This was much easier and less time consuming than piping out individual lady fingers, ensuring they are all the same size and layering them one at a time on the cake.

The next component was a coffee soaking syrup to add flavour to the lady fingers, which are pretty bland on their own.  This was a mixture of simple syrup, strong coffee and Kahlua.

The final component was the filling, the hardest part.  First we made whipped cream.  Then hand mixed the mascarpone cheese, making sure we didn't over mix, because it can easily become grainy.  Then dissolved sugar in egg yolks over a water bath.  Then the yolks and whipped cream were gently folded into the mascarpone.  Brandy, water and gelatin were mixed over a water bath to dissolve the gelatin.  Egg whites were whipped to soft peaks with sugar.  Then the gelatin brandy mixture was tempered and added to the cheese mixture and then the egg whites were folded in...so many steps and so many dishes!


 Finally to assemble the cake :)  This was pretty straight forward, using a cake ring, we placed the strip of lady fingers around the side and put the cake round in the bottom, brushed it all with a good amount of coffee syrup, filled it up with the mascarpone filling and topped with cocoa powder.  Several hours later, with some time in the blast chiller, it was ready to be taken home.


This was the most difficult cake so far, but it is also my favourite, I think the effort put in was really worth it.   The quality of ingredients and flavour of coffee really come through, without the coffee being overpowering.  Next time I do this though, I will soak the sides of the cake in even more coffee syrup, to keep it all moist.   


Saturday, 19 April 2014

Week 6: Peach Yogurt Mousse Cake


For this week's cake, the work was spread out over 2 weeks!  So after making the Linzer torte last week, we made the sponge for this cake and left it in the freezer.

The sponge for this cake, Hot Milk Sponge, was really yummy and different from other sponge cakes I've made before and it was fairly simple to make.  What makes this cake so unique, moist and delicious was the heating up the milk and eggs with sugar separately and then whipping them together later in the recipe.  When the cake was right out of the oven, it smelled like it was going to taste really eggy, but by the time I tried some the following week after the freezing, it didn't have an eggy flavour at all.

The yogurt mousse filling was a mixture of whipped cream and yogurt, with a little bit of gelatin for added stability.  We used a full fat yogurt, but at home, you can substitute for a lower fat content, but you'd have to increase the gelatin to compensate.  The instructor explained if you were to switch out the peaches for citrus, you would have to increase the gelatin even more to prevent the citrus from breaking down the mousse.   

When using gelatin, it's important to dissolve it over heat and temper it when incorporating.  The tempering ensures that it is not shocked when mixing it into the cold mousse and the heat makes sure it fully dissolves with no lumps.

The assembly was pretty quick.  We used cake ring molds to cut the cake layers out of the sheet tray. After lining the cake ring with a strip of acetate, we layered a cake circle, brushed on a good amount of simple syrup, spread some yogurt mousse and then some diced peaches.  We repeated this, until the cake was the desired height, except the diced peaches on the top layer. 


For the top, we sliced peaches and arranged them nicely.  This was the most time consuming part, and it didn't even take that long.  To finish it off, we sealed everything in with some apricot glaze and covered the sides with mousse and sliced almonds.


We used canned peaches for all of this, so I'd be interested to see if fresh fruit would hold up the same.  I think this cake could work really well with strawberries :)  

Sunday, 16 March 2014

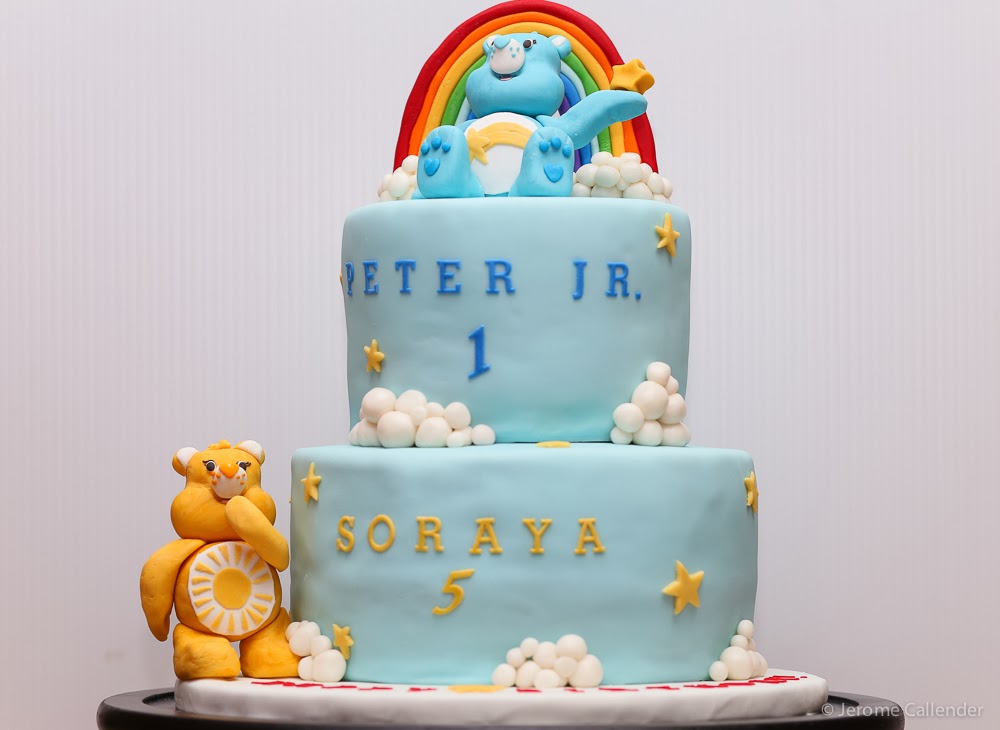
Care Bear Cake

I was asked to make a cake for a combined 1st and 5th birthday party.  The girl who was turning 5 loves care bears, so I made a care bear cake, which had a care bear and a cake tier for each child :)

This was a fun cake for me since I loved the care bears growing up and in order to make the cake accurate I had to do some research, which meant watching some care bear episodes :)  The Care Bears have really changed since I was a kid, now it's all computer generated, but the episodes were still fun to watch.

This was my first time trying to make figurines and it took me forever!  I spent at least 2 hours on each.  
I found getting the right shape of the faces to be really difficult.  I was continuously trying to adjust it until it was as close I could get it.  I used a mixture of fondant and gum paste to make them, so I tried to work as quickly as I could as it started to dry out and harden.


I made all the body parts separately and left them to dry overnight.


Then the parts were all stuck together with water.  I used props to hold the arms up while they dried over night.


The bottom tier was a 4 layer 9" vanilla cake and the top tier was 4 layer 6" chocolate cake.  They were both filled with Italian meringue buttercream and covered with chocolate ganache.  The ganache I made had too much chocolate to cream, so as I was using it, I had to thin batches of it out with dashes of more cream, but it still worked out well on the cake.


I made the LMF fondant the day before and tinted it blue.  The first time I tried to cover the top tier I rolled the fondant too thin and could see through it to the ganache in some parts, but since the ganache was pretty firm, I just peeled the fondant off and tried again until I was happy with it.  I find when using LMF fondant, you have to roll it a little bit thicker than store bought fondant, but that's okay since LMF tastes better than store bought, it's ok to have more of it on the cake.

The cake board/drum was covered in fondant the day before stacking.  I made the mistake of covering the board too late before, so I knew to cover the board at least a day in advance to let the fondant on the board dry before trying to put stuff on it, otherwise the fondant on the board is soft, so it nicks and rips while stacking.  After covering both tiers with fondant, I put some bubble tea straws in for supports and stacked the top tier on.


Now for the decorations :)  I made rounds of white fondant for the clouds.  The rainbow was made by rolling out long strips of each colour, sticking them together with water and forming them into an arc. This was left to dry for over 24 hours until it was firm enough to stand up.  It was stuck into the cake with toothpicks.


The letters and numbers were made with tappits and then the stars were cut out by hand.


This cake took me many hours to make spanning over an entire week working every week night after work and then another 5-6 hours on the weekend, but I'm pretty happy with the results and so were the customers, so that's all that really matters :)