Showing posts with label fondant. Show all posts

Monday, 9 February 2015

Baby Boy's Baptism Cake with Cupcakes

All Photography by:  Jerome Callender Photography

So, it's been a long time since I've been able to post anything.  I've had a lot going on in my life, I got married, went on a honeymoon and moved into a new house!  Now that all the wedding planning, traveling and moving is complete, I have some time to catch up on my blog.  This baptism cake is from a few months ago and my wedding cake will be a blog post soon, once the wedding pictures are ready!

I made this cake for my friend's baby boy's baptism.  He's such an adorable little guy, I was excited to make it for him :)


His parents requested chocolate cake with vanilla buttercream.  I'm always happy to do a buttercream cake, as I think it tastes much better than fondant, but does sometimes take me more time to get smooth with sharp edges. 

This cake was three layers of chocolate cake filled and covered with vanilla Italian meringue buttercream.


To decorate the cake, I made a cross motif out of rolled fondant with a bit of gumpaste.  Also a simple border with a bow and the cake was done!


For the cupcakes, I did a swirl of buttercream with a large star tip.  The topper "L"s were made of piped white chocolate.  I wrote out 20 "L"s on a page, covered it with a piece of wax paper and piped onto that.  I like to have a stencil, but you could pipe it free hand.  The chocolate was put in the fridge for a few minutes and they were ready to go on the cupcakes :) 


The last part of this cake setup was the blocks.  They were made out of rice krispie treats (RKT) covered in fondant.  I didn't cover them in buttercream first, just rolled the fondant out thick, so that the lumps and bumps in the RKT couldn't be seen.  The letters for the blocks were made using a chocolate letter mold.  I first thought the chocolate letters could stick to the fondant with a bit of water, but quickly learned that it doesn't hold after the water dries and used melted chocolate instead.

 Congratulations Leo!

Saturday, 11 October 2014

Floral Ombre 50th Birthday Cake

For my aunt's 50th birthday, she asked me to make her a cake!  I obviously happily said yes :)

I pretty much had free reign on the cake, so I thought I should try something new.  I had bought the Wilton's gum paste flower cutter set, so this was a perfect excuse to use it.  Since I like purple and ombre always looks pretty, the colour scheme was chosen!

My cousin said that Red Velvet with Cream Cheese was his mom's flavour of choice, so that was chosen too!

This was a 2 layer cake, covered and filled with cream cheese icing and then topped with fondant.  This was a big mistake!  Cream cheese icing does not work well under fondant at all, hence the dome like shape! It doesn't hold it's shape and just slides around creating large bumps. When I needed to use cream cheese icing under fondant again, I created a buttercream dam around the cream cheese filling and then covered the cake in more buttercream before covering in fondant, which worked much better.  Buttercream stays fairly firm at room temperature which allows the cake corners to be sharper after it's covered in fondant.


I spent hours creating these little flowers, and  then went to work adding them from the bottom up.  I think the effect was pretty :)

From this view you can see how the cream cheese icing made the cake so lob sided :(


The '50' was made a few days in advance, so the gum paste had time to dry.


In the end, my aunt and family enjoyed cake, so I was happy with the overall result :)

Monday, 25 August 2014

A mishmash of my recent baking

Sorry I haven't had much time to post anything lately, but that doesn't mean I haven't been baking! :)

Here are a few things I've made in the past month or so...


A coworker of mine ordered this cake for his friend last minute, so I made my go to chocolate cake and decided to ice it with Italian meringue buttercream.  I was excited to decorate it since I wanted an excuse to use my new cake comb on the sides.  It was so easy to use and made the cake looked finished.  I did a reverse shell border around the edge, made some fondant letters with my tappits and it was done!


I made these chocolate cupcakes for my nephew to share with his friends on his last day of daycare. He was excited to help me put the sprinkles on, but even more so to eat them, especially the icing!


This cake I made for my cousins belated graduation BBQ.  Congratulations Hannah :)  It was a red velvet cake filled with cream cheese icing and covered with chocolate ganache and marshmallow fondant.  With this cake, I got to use my new quilting impression mat for the sides, it didn't make the groves as crisp as I wanted, but it was much faster than doing each line individually. 


That's all for now, but more posts coming soon!

Sunday, 6 July 2014

Bridal Shower Cupcake Cake


Recently I offered to make a cake for a friend's bridal shower at work.  I'm also making this friend's wedding favours, more on this in a few weeks :)

I was given free reign on the cake and told it only needed to feed 12 people.  Since it was going to be at work, I knew it's always better to have extra cake, in case more people showed up.  From my experience, there no such thing as too much cake at my work place!

I've seen a lot of bridal gown cupcake cakes during the hours I've spent on Pinterest, so I thought I'd give it a try.  I decided to go with this layout, which used 28 red velvet cupcakes.  I actually baked 36 cupcakes, as I tripled the recipe. 

My first batch didn't turn out well, as I accidentally mixed the sugar in with the dry ingredients, so I wasn't able to cream the oil and sugar together.  This caused the first batch to come out slightly oily and not rise properly, since creaming the oil with the sugar is when all the air is incorporated.  The flavour was still good, just the texture was slightly off.  This bad batch worked out in my family/friends favour, as it just meant more cupcakes for them :)   

I chose to use a cream cheese icing and iced the cupcakes using simple rosettes.  This cake looks really fancy, but it literally took less than 10 minutes to ice! 

A few days before the cake was going to be delivered, I made a quick bow out of fondant and left it to dry on a foam pad.  By the time it needed to be placed on the cake, it was all dry and firm.  The only mistake I made was putting it on the cake and then placing the entire thing into the fridge.  As soon as the fondant was in the fridge, it started to sweat and become soft, thankfully it wasn't there for too long and the bow kept most of its shape.  Next time, I'll just place the bow on right before delivery. 

I placed a purple sash and then the bow on top, and the cake was finished!


It was all well received, which I was happy about, and the bride was completely surprised :)  Some even asked for the recipe, which I think is a big compliment, I'm hoping it works out well for them too!  

Sunday, 16 March 2014

Care Bear Cake

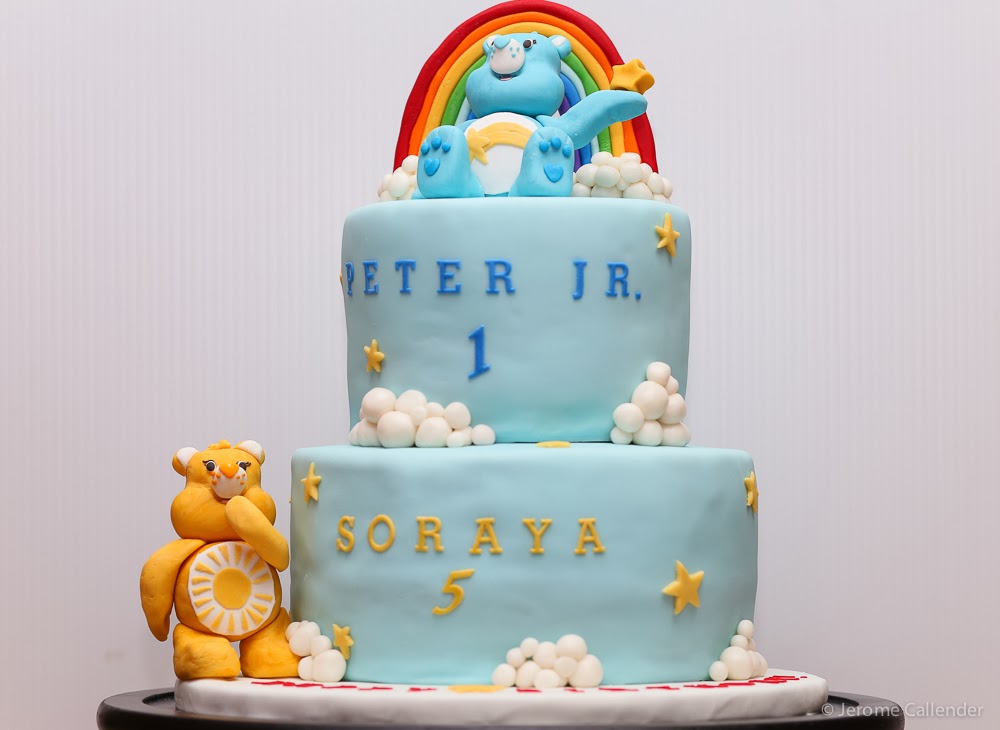
I was asked to make a cake for a combined 1st and 5th birthday party.  The girl who was turning 5 loves care bears, so I made a care bear cake, which had a care bear and a cake tier for each child :)

This was a fun cake for me since I loved the care bears growing up and in order to make the cake accurate I had to do some research, which meant watching some care bear episodes :)  The Care Bears have really changed since I was a kid, now it's all computer generated, but the episodes were still fun to watch.

This was my first time trying to make figurines and it took me forever!  I spent at least 2 hours on each.  
I found getting the right shape of the faces to be really difficult.  I was continuously trying to adjust it until it was as close I could get it.  I used a mixture of fondant and gum paste to make them, so I tried to work as quickly as I could as it started to dry out and harden.


I made all the body parts separately and left them to dry overnight.


Then the parts were all stuck together with water.  I used props to hold the arms up while they dried over night.


The bottom tier was a 4 layer 9" vanilla cake and the top tier was 4 layer 6" chocolate cake.  They were both filled with Italian meringue buttercream and covered with chocolate ganache.  The ganache I made had too much chocolate to cream, so as I was using it, I had to thin batches of it out with dashes of more cream, but it still worked out well on the cake.


I made the LMF fondant the day before and tinted it blue.  The first time I tried to cover the top tier I rolled the fondant too thin and could see through it to the ganache in some parts, but since the ganache was pretty firm, I just peeled the fondant off and tried again until I was happy with it.  I find when using LMF fondant, you have to roll it a little bit thicker than store bought fondant, but that's okay since LMF tastes better than store bought, it's ok to have more of it on the cake.

The cake board/drum was covered in fondant the day before stacking.  I made the mistake of covering the board too late before, so I knew to cover the board at least a day in advance to let the fondant on the board dry before trying to put stuff on it, otherwise the fondant on the board is soft, so it nicks and rips while stacking.  After covering both tiers with fondant, I put some bubble tea straws in for supports and stacked the top tier on.


Now for the decorations :)  I made rounds of white fondant for the clouds.  The rainbow was made by rolling out long strips of each colour, sticking them together with water and forming them into an arc. This was left to dry for over 24 hours until it was firm enough to stand up.  It was stuck into the cake with toothpicks.


The letters and numbers were made with tappits and then the stars were cut out by hand.


This cake took me many hours to make spanning over an entire week working every week night after work and then another 5-6 hours on the weekend, but I'm pretty happy with the results and so were the customers, so that's all that really matters :)

Monday, 17 February 2014

Baptism Bible Cake

I made a cake for my niece a few weeks ago :)   It was a bible cake made with the Wilton's book pan that her parents provided for me.

They requested a traditional butter cake.  I had some issues with cracking on the top during baking.  I think it was because I had the oven temperature too high (350) when I should really have done it at 325 or even 300 degrees Fahrenheit.  The 350 degrees would usually be okay for a butter cake, but since this pan is so large, I should've reduced the temperature to make sure the middle was baked before the outsides started burning.  The cracking wasn't too big of an issue though since it went on the bottom, so I just trimmed it to make it level and flipped it over.

I crumb coated the cake in a simple buttercream icing, just  butter and icing sugar and made it as smooth as possible.  I left that to set in the fridge while I made the LMF fondant.  LMF is really easy to make and ready for use right after it is made which makes it quite convenient.  So as soon as I made the fondant, I rolled it out and covered the cake.  To make the crease in the book more visible, I used the ball tool from my gumpaste tool set to push into the crease. 


 After tinting some fondant pink, I used a mold to make the border and a strip of rolled fondant to make the book mark.  The silicon molds are very convenient for making borders and other decorations.  The key to using them is to brush it with cornstarch or powdered sugar first, so the fondant/gum paste pops out easily and to push the fondant/gum paste in level with the back of the mold so that the decoration sits flat on the cake when its done.


I formed the cross out of strips of fondant mixed with some tylose powder to stiffen it up.  The cross was a little tricky and took me some time to get right, as it was hard to free form all the pieces and make them symmetrical.  The letters were made with tappits.  The detail above the date was made using the same mold as the border.   


This cake ended up getting completed all in one day, from baking to completion.  This is a big accomplishment for me since usually I take days to get a cake done!


Wednesday, 5 February 2014

Winter Topsy Turvy Birthday Cake

I was asked to make one of my closest friend's son's first birthday cake!  She wasn't picky, just wanted a topsy turvy cake with a wintery theme.  So, I got to work watching videos and reading tutorials on how to make a topsy turvy cake.

As it was around the holidays and I had lots of other baking to do, I baked the cakes 2 weeks in advance and placed them in the freezer.  This not only helps me be less stressed closer to delivery, but also makes for a moist cake that is easy to carve with less crumbs.  I also made the LMF (fondant) about a week in advance and tinted it the colours needed.

The bottom tier started out with 3 layers of 9" round confetti cake (I doubled this recipe).  After a week, I thought that the 3 layers were not tall enough and made another 2 - 9" rounds from cake mix.  The middle tier was made out of 4 layers of 6" round chocolate cake (the only change I made to the recipe was adding some instant coffee to the boiling water, to enhance the chocolate flavour).  The top tier was rice krispie treats cut into a cube. 


I filled and stacked both cakes with Italian meringue buttercream (IMBC).  With the confetti cake, I alternated the scratch cake with the mix cake.  This was important to do as the cakes had very different consistencies and colours, so not alternating would make it look very odd.

Then came the carving...this part was kind of stressful for me, as I was worried about the angles and accidentally cutting off too much, but the cake was very forgiving.  I cut on an angle from the top corner down and then took the trianglular piece of cake off, inverted it and stuck it back on with icing to steepen the top angle.  I also tappered the sides of the cake slightly to exaggerate the topsy turvy look.  For the bottom tier, I made a flat area in the middle to fit the middle tier snugly.  I put bubble tea straws vertically in this area to support the weight of the middle tier.  (sorry I didn't take the picture after the straws were inserted)  

I then crumb coated the bottom tier with more IMBC and covered the middle tier with chocolate ganache.  I realized at this point that both of these tiers were much too tall and removed 2 layers from the confetti cake and 1 layer from the chocolate.  I started thinking what was the point of baking the extra 2 mix cakes, but realized I wouldn't have had the same height with just the 3 layers of scratch cake, so it wasn't a complete waste of time :)


It was probably past midnight, into the day of delivery and it was time for fondant :)  There are some flaws in the fondant, but most of that was all covered with decorations.  :) 


 A few days before delivery, I made the royal icing snow flakes.  I drew snow flakes out on paper, covered it with wax paper and piped over it with a small icing tip.  These dried for a few days to made sure they were hard.  I made lots of extra snow flakes because they are super fragile and break easily when trying to attach to the cake with royal icing.


The top tier was done 2 days before delivery, I covered it in red fondant and white fondant ribbon.  For the bow on the top, I made the small loops separately and let them dry over night before sticking it all together with royal icing.  The 'tissue paper' for inside the box was rolled fondant, left to dry on an uneven surface.  This tier was stuck to the middle tier with more royal icing.   


The cake drum was covered in a thin layer of fondant (I did this last minute, but if I was to do it again, I'd do it in advance so the fondant wouldn't be so soft when putting the cake on).  I cut out various sizes of red fondant circles and attached them to the middle tier with water.  The snowman was made out of a 50:50 mix of fondant and gumpaste.  I used tappits to make all of the letters.

After many many hours in the kitchen, the cake was ready for the box :)


They had a really nice set up and I think the cake fit nicely in it :)  Happy First Birthday Zac!

Monday, 7 October 2013

Mickey's Clubhouse Cake

A few weeks ago, I got an order for a Mickey's Clubhouse cake through a coworker.  I'd never actually heard of Mickey's clubhouse before this, and was worried I may have to sculpt an actual Mickey out of fondant, but this wasn't the case :)


The customers were very specific about what they wanted, so my coworker provided me with this sketch.

They were going to provide figurines (Mickey, Minnie and Goofy) to place on the cake and wanted a non-edible topper to have as a keepsake on top of a 9" confetti cake.


I started my research by looking up what the clubhouse actually looks like.
 
Once I got a feel for the proportions I needed, I bought various size styrofoam balls for the body, head and ears.

As I don't like the taste of store bought fondant, I decided to make my own marshmallow fondant (mmf).  I've had some problems before with marshmallow fondant, finding it difficult to roll out, so I tried a new recipe...Elizabeth Marek's Fondant Recipe (lmf).  The only difference between the two is, adding a little bit of store bought fondant to regular marshmallow fondant.  This makes it much more pliable and easy to work with it, but with a much better flavour than store bought!

For the fondant, I made four different batches...white, green, black and red.  I find adding colour to the melted marshmallows is much easier than kneading it in, so although I had to do several more dishes to make multiple batches for different colours, it is still easier than making one batch of white and kneading in the colours after.  For the black fondant, I used melted chocolate, cocoa powder and black gel colouring to get it dark.  For the red fondant, I used red candy melts and red gel colouring.  I found that it still wasn't as red as I would like, so I painted the 'body' of the clubhouse with a little vodka and red gel colouring.  For small details like the yellow shoe or blue windows, I mixed gel colouring into the white fondant batch by hand.


Well before the cake was due, I put together the topper parts and left them to dry.  To make the parts I covered styrofoam with shortening and then covered them with fondant that had been mixed with some gum-tex.  For the fingers, I free formed fondant with gum-tex and attached it with toothpicks to the styrofoam palm. 

A day after, I covered a 6" cake board (in the same colour that the cake was going to be in) with fondant and assembled the parts.  This was left to dry even further.

The next day, I added some more details.

A day before I was going to deliver, I made a batch of white chocolate ganache and left it to set.

The evening of delivery, I torted, filled and covered the cake with ganache, then left it in the fridge to set for about an hour.  During this time, I kneaded and rolled out the fondant.

Working quickly once the cake was out of the fridge, I misted it lightly with water to help the fondant stick and covered it with the rolled fondant.  Then I went to work smoothing it out with a fondant smoother. 


I placed a small round of parchment on top of the cake (so the customer could easily remove the topper), then placed the topper on top.  I used a fondant border to hide the edge of the topper's cake board. 


To make the letters, I used Tappits, which allowed me to cut the letters out of thinly rolled fondant with gum-tex. 


To make the grass, I pushed some green fondant through a mesh strainer and cut off little chunks.


For the toodles, I printed out a picture and stuck it to some gumpaste.  The fence was all hand cut from rolled fondant.  

This cake was a lot of work, but I'm glad that it turned out well and the customer enjoyed it!