Showing posts with label LMF. Show all posts

Sunday, 16 March 2014

Care Bear Cake

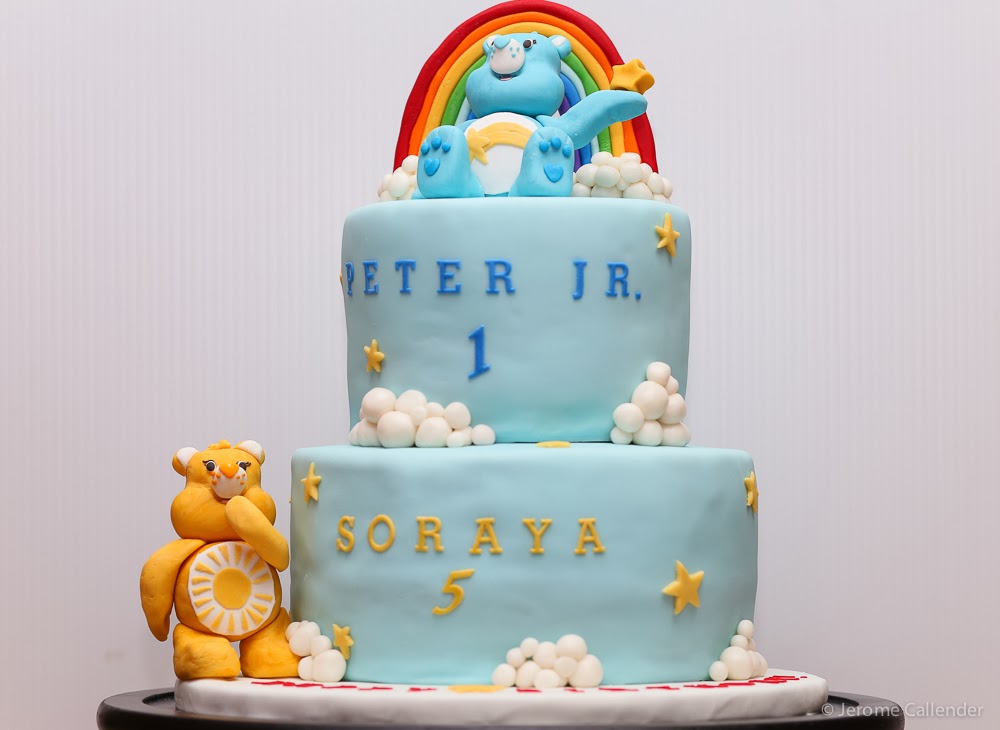
I was asked to make a cake for a combined 1st and 5th birthday party.  The girl who was turning 5 loves care bears, so I made a care bear cake, which had a care bear and a cake tier for each child :)

This was a fun cake for me since I loved the care bears growing up and in order to make the cake accurate I had to do some research, which meant watching some care bear episodes :)  The Care Bears have really changed since I was a kid, now it's all computer generated, but the episodes were still fun to watch.

This was my first time trying to make figurines and it took me forever!  I spent at least 2 hours on each.  
I found getting the right shape of the faces to be really difficult.  I was continuously trying to adjust it until it was as close I could get it.  I used a mixture of fondant and gum paste to make them, so I tried to work as quickly as I could as it started to dry out and harden.


I made all the body parts separately and left them to dry overnight.


Then the parts were all stuck together with water.  I used props to hold the arms up while they dried over night.


The bottom tier was a 4 layer 9" vanilla cake and the top tier was 4 layer 6" chocolate cake.  They were both filled with Italian meringue buttercream and covered with chocolate ganache.  The ganache I made had too much chocolate to cream, so as I was using it, I had to thin batches of it out with dashes of more cream, but it still worked out well on the cake.


I made the LMF fondant the day before and tinted it blue.  The first time I tried to cover the top tier I rolled the fondant too thin and could see through it to the ganache in some parts, but since the ganache was pretty firm, I just peeled the fondant off and tried again until I was happy with it.  I find when using LMF fondant, you have to roll it a little bit thicker than store bought fondant, but that's okay since LMF tastes better than store bought, it's ok to have more of it on the cake.

The cake board/drum was covered in fondant the day before stacking.  I made the mistake of covering the board too late before, so I knew to cover the board at least a day in advance to let the fondant on the board dry before trying to put stuff on it, otherwise the fondant on the board is soft, so it nicks and rips while stacking.  After covering both tiers with fondant, I put some bubble tea straws in for supports and stacked the top tier on.


Now for the decorations :)  I made rounds of white fondant for the clouds.  The rainbow was made by rolling out long strips of each colour, sticking them together with water and forming them into an arc. This was left to dry for over 24 hours until it was firm enough to stand up.  It was stuck into the cake with toothpicks.


The letters and numbers were made with tappits and then the stars were cut out by hand.


This cake took me many hours to make spanning over an entire week working every week night after work and then another 5-6 hours on the weekend, but I'm pretty happy with the results and so were the customers, so that's all that really matters :)

Monday, 17 February 2014

Baptism Bible Cake

I made a cake for my niece a few weeks ago :)   It was a bible cake made with the Wilton's book pan that her parents provided for me.

They requested a traditional butter cake.  I had some issues with cracking on the top during baking.  I think it was because I had the oven temperature too high (350) when I should really have done it at 325 or even 300 degrees Fahrenheit.  The 350 degrees would usually be okay for a butter cake, but since this pan is so large, I should've reduced the temperature to make sure the middle was baked before the outsides started burning.  The cracking wasn't too big of an issue though since it went on the bottom, so I just trimmed it to make it level and flipped it over.

I crumb coated the cake in a simple buttercream icing, just  butter and icing sugar and made it as smooth as possible.  I left that to set in the fridge while I made the LMF fondant.  LMF is really easy to make and ready for use right after it is made which makes it quite convenient.  So as soon as I made the fondant, I rolled it out and covered the cake.  To make the crease in the book more visible, I used the ball tool from my gumpaste tool set to push into the crease. 


 After tinting some fondant pink, I used a mold to make the border and a strip of rolled fondant to make the book mark.  The silicon molds are very convenient for making borders and other decorations.  The key to using them is to brush it with cornstarch or powdered sugar first, so the fondant/gum paste pops out easily and to push the fondant/gum paste in level with the back of the mold so that the decoration sits flat on the cake when its done.


I formed the cross out of strips of fondant mixed with some tylose powder to stiffen it up.  The cross was a little tricky and took me some time to get right, as it was hard to free form all the pieces and make them symmetrical.  The letters were made with tappits.  The detail above the date was made using the same mold as the border.   


This cake ended up getting completed all in one day, from baking to completion.  This is a big accomplishment for me since usually I take days to get a cake done!


Monday, 7 October 2013

Mickey's Clubhouse Cake

A few weeks ago, I got an order for a Mickey's Clubhouse cake through a coworker.  I'd never actually heard of Mickey's clubhouse before this, and was worried I may have to sculpt an actual Mickey out of fondant, but this wasn't the case :)


The customers were very specific about what they wanted, so my coworker provided me with this sketch.

They were going to provide figurines (Mickey, Minnie and Goofy) to place on the cake and wanted a non-edible topper to have as a keepsake on top of a 9" confetti cake.


I started my research by looking up what the clubhouse actually looks like.
 
Once I got a feel for the proportions I needed, I bought various size styrofoam balls for the body, head and ears.

As I don't like the taste of store bought fondant, I decided to make my own marshmallow fondant (mmf).  I've had some problems before with marshmallow fondant, finding it difficult to roll out, so I tried a new recipe...Elizabeth Marek's Fondant Recipe (lmf).  The only difference between the two is, adding a little bit of store bought fondant to regular marshmallow fondant.  This makes it much more pliable and easy to work with it, but with a much better flavour than store bought!

For the fondant, I made four different batches...white, green, black and red.  I find adding colour to the melted marshmallows is much easier than kneading it in, so although I had to do several more dishes to make multiple batches for different colours, it is still easier than making one batch of white and kneading in the colours after.  For the black fondant, I used melted chocolate, cocoa powder and black gel colouring to get it dark.  For the red fondant, I used red candy melts and red gel colouring.  I found that it still wasn't as red as I would like, so I painted the 'body' of the clubhouse with a little vodka and red gel colouring.  For small details like the yellow shoe or blue windows, I mixed gel colouring into the white fondant batch by hand.


Well before the cake was due, I put together the topper parts and left them to dry.  To make the parts I covered styrofoam with shortening and then covered them with fondant that had been mixed with some gum-tex.  For the fingers, I free formed fondant with gum-tex and attached it with toothpicks to the styrofoam palm. 

A day after, I covered a 6" cake board (in the same colour that the cake was going to be in) with fondant and assembled the parts.  This was left to dry even further.

The next day, I added some more details.

A day before I was going to deliver, I made a batch of white chocolate ganache and left it to set.

The evening of delivery, I torted, filled and covered the cake with ganache, then left it in the fridge to set for about an hour.  During this time, I kneaded and rolled out the fondant.

Working quickly once the cake was out of the fridge, I misted it lightly with water to help the fondant stick and covered it with the rolled fondant.  Then I went to work smoothing it out with a fondant smoother. 


I placed a small round of parchment on top of the cake (so the customer could easily remove the topper), then placed the topper on top.  I used a fondant border to hide the edge of the topper's cake board. 


To make the letters, I used Tappits, which allowed me to cut the letters out of thinly rolled fondant with gum-tex. 


To make the grass, I pushed some green fondant through a mesh strainer and cut off little chunks.


For the toodles, I printed out a picture and stuck it to some gumpaste.  The fence was all hand cut from rolled fondant.  

This cake was a lot of work, but I'm glad that it turned out well and the customer enjoyed it!